
Nailed It!
+7
Laura
candyrain
HanSpan
ninjablossom
Sally Magpie
JackieP
Geordie Nails
11 posters
Page 1 of 1

Nailed It!
![]() Geordie Nails Fri Aug 23, 2013 5:56 pm
Geordie Nails Fri Aug 23, 2013 5:56 pm
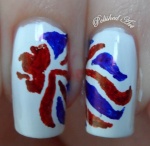
I tried to copy a Pinterest mani and it worked out so well I had to show everyone...
[You must be registered and logged in to see this link.]

I would seriously love any tips on how to replicate that lovely manicure [You must be registered and logged in to see this link.], but also I think it's healthy to show off your nail art fails every so often!
[You must be registered and logged in to see this link.]
I would seriously love any tips on how to replicate that lovely manicure [You must be registered and logged in to see this link.], but also I think it's healthy to show off your nail art fails every so often!

Geordie Nails- Posts : 617
Thanks : 73
Join date : 2013-05-03
Location : NE England -

Re: Nailed It!
![]() JackieP Fri Aug 23, 2013 6:22 pm
JackieP Fri Aug 23, 2013 6:22 pm
You still did better than I would! 
I may eventually attempt something more adventurous than simply slapping polish on, I'll be more than happy to share my inevitable fails when that time comes, lol.
I may eventually attempt something more adventurous than simply slapping polish on, I'll be more than happy to share my inevitable fails when that time comes, lol.

JackieP- Posts : 227
Thanks : 13
Join date : 2013-08-15
Age : 50
Location : Hull
Re: Nailed It!
![]() Sally Magpie Fri Aug 23, 2013 7:14 pm
Sally Magpie Fri Aug 23, 2013 7:14 pm
I can't gradient to save my life, and it pisses me right off.

Sally Magpie- Posts : 2554
Thanks : 107
Join date : 2012-08-21
Age : 48
Location : Walsall -
Re: Nailed It!
![]() ninjablossom Fri Aug 23, 2013 7:38 pm
ninjablossom Fri Aug 23, 2013 7:38 pm
fab!!
I tried some models inc gradients the other week. I really liked it (probably crap by other standards but progress for me!) but as I used pastels the effect was quite subtle. Need to break out the loud polishes I think. I love the purple on here!
I tried some models inc gradients the other week. I really liked it (probably crap by other standards but progress for me!) but as I used pastels the effect was quite subtle. Need to break out the loud polishes I think. I love the purple on here!

ninjablossom- Posts : 1246
Thanks : 57
Join date : 2013-02-16
Age : 109
Location : Surrey -
Re: Nailed It!
![]() HanSpan Fri Aug 23, 2013 7:58 pm
HanSpan Fri Aug 23, 2013 7:58 pm
I've only done one gradient and it woked out pretty well but I'm not sure my method would be considered wise!
I used the essence sponges I got from Sal.
1: Have too much to drink
2: Paint PVA all round the edges
3: Generously splodge 3 colours on the sponge
4: Smoosh round nails & fingers covering half of hands & leaving alayer thick enough it will take ages to dry
5: Try and remove some of said thickness with dry bit of sponge making even more of a mess
6: Drink some more whilst feeling sorry for yourself
7: Decide its been long enough & seche vite it
8: Dpend next hour or so trying to remove mess from around cuticles (well at least it gave it time to dry)
9: Bed
10: Next morning review the mess and get out the acetone & start the serious job of tidying, ruing the amount of lovely polish you wated in the messiest mani ever.
but it looked pretty good!
HanSpan- Posts : 1889
Thanks : 61
Join date : 2012-08-22
Re: Nailed It!
![]() ninjablossom Fri Aug 23, 2013 8:02 pm
ninjablossom Fri Aug 23, 2013 8:02 pm
Lol Han.
I like no. 7 - I really do try and not use SV all the time but it always takes too long and ends up being used
I like no. 7 - I really do try and not use SV all the time but it always takes too long and ends up being used
ninjablossom- Posts : 1246
Thanks : 57
Join date : 2013-02-16
Age : 109
Location : Surrey -
Re: Nailed It!
![]() candyrain Fri Aug 23, 2013 8:29 pm
candyrain Fri Aug 23, 2013 8:29 pm
If you're going to paint a bit of the colour on top with a brush, I would just do the very tip of it, if you look at the picture it's only the top quarter at the most that is fully saturated with the colour.
Have small amounts of polish on your sponge, dab gently on a bit of foil/plastic, to get rid of the excess, it's easier to build it up slowly and build up a gradient. (This is for if you sponge on rather than put your whole nail on the sponge) Hope that helps!
Have small amounts of polish on your sponge, dab gently on a bit of foil/plastic, to get rid of the excess, it's easier to build it up slowly and build up a gradient. (This is for if you sponge on rather than put your whole nail on the sponge) Hope that helps!
Last edited by candyrain on Fri Aug 23, 2013 8:34 pm; edited 1 time in total

candyrain- Posts : 25
Thanks : 3
Join date : 2013-06-15

Laura- Posts : 2727
Thanks : 86
Join date : 2012-10-16
Age : 32
Location : West Sussex
Re: Nailed It!
![]() Geordie Nails Sat Aug 24, 2013 5:22 am
Geordie Nails Sat Aug 24, 2013 5:22 am
Thank you!!candyrain wrote:If you're going to paint a bit of the colour on top with a brush, I would just do the very tip of it, if you look at the picture it's only the top quarter at the most that is fully saturated with the colour.
Have small amounts of polish on your sponge, dab gently on a bit of foil/plastic, to get rid of the excess, it's easier to build it up slowly and build up a gradient. (This is for if you sponge on rather than put your whole nail on the sponge) Hope that helps!
(I am lolling at the Hanspan method, sounds legit)
Geordie Nails- Posts : 617
Thanks : 73
Join date : 2013-05-03
Location : NE England -
Re: Nailed It!
![]() Sam Sat Aug 24, 2013 5:43 am
Sam Sat Aug 24, 2013 5:43 am
Geordie that really made me laugh :p
I am pretty appalling at gradients, but i've been pretty happy with my last two. I've read tutorials in a load of various places, and this is the technique I used:
Paint nail with the lightest colour of your gradient. Let this dry!
Paint stripes of your colours on to your sponge. Dab onto your nail a few times, moving up and down very slightly to blend the colours. I topped up my sponge about every 3 nails.
Don't worry about the colour not being too intense (I think this was the main mistake I'd been making before!). Just repeat on all your nails 3-4 times until you're happy with the intensity.
And, I also recommend wine.
Sam- Posts : 878
Thanks : 50
Join date : 2012-08-27
Age : 35 -
Re: Nailed It!
![]() TattyScone Sat Aug 24, 2013 5:45 am
TattyScone Sat Aug 24, 2013 5:45 am
You look like you've made a better job of it than I could
I came across this, looks like what Sam was recommending:
[You must be registered and logged in to see this image.]
I came across this, looks like what Sam was recommending:
[You must be registered and logged in to see this image.]

TattyScone- Posts : 137
Thanks : 15
Join date : 2013-03-26
Age : 46
Location : Glasgow
Re: Nailed It!
![]() Geordie Nails Sat Aug 24, 2013 6:36 am
Geordie Nails Sat Aug 24, 2013 6:36 am
Oh pictures help very much! I haven't been soaking my sponge in water, maybe that's worth a go.
Geordie Nails- Posts : 617
Thanks : 73
Join date : 2013-05-03
Location : NE England -
Re: Nailed It!
![]() annita008 Sat Aug 24, 2013 11:10 am
annita008 Sat Aug 24, 2013 11:10 am
i didnt know that either o.oGeordie Nails wrote:Oh pictures help very much! I haven't been soaking my sponge in water, maybe that's worth a go.

annita008- Posts : 329
Thanks : 32
Join date : 2013-04-11
Age : 33
Location : Chile
Re: Nailed It!
![]() fellrunner Sun Aug 25, 2013 9:26 pm
fellrunner Sun Aug 25, 2013 9:26 pm
I've been working on my gradients a bit recently.........
a couple of things I found that helped are:
1. Keep the sponge wet, it stops the colours soaking in and they blend better. If it's looking dry, I'll lick my finger and rub it on the sponge before I reload the sponge with colour
2. Make sure the base is completely dry before you start sponging colour on top.
3. Thicker, creamier polishes with lots of pigment in them work better than thin, sheer ones. Barry M Gelly colours are brilliant for gradients
4. Probably not essential (and not always possible) but I've had better results using polishes from the same brand.
Here are links to a couple I've done recently:
[You must be registered and logged in to see this link.]

fellrunner- Posts : 149
Thanks : 12
Join date : 2013-04-11
Location : UK -
Page 1 of 1
Permissions in this forum:
You cannot reply to topics in this forum|
|
|